Tuesday, February 1, 2011

Better For You Cookies and .....More Snow

Guess what's outside my window....


More snow! It never stops apparently! 

New York is doing it's best to break me into a real winter. We actually set a record for January snow fall. Lucky me! I keep saying to the hubby "Oh I'm sorry, I didn't realize we moved to Minnesota." 


I'm just a smart ass like that. And for the record, I'm handling the weather quite well. Better than I expected really. I have my magical battery powered heated boots to thank for that!


In the spirit of the season, I've been having a crazy cookie craving. I hardly ever have your regular, empty-calorie sweets anymore, much as I love them. But with more focus on nutrition and how my body reacts to such things (physically and emotionally), I've abstained for the most part, and haven't missed the stuff. 

My new love is dark chocolate, rich in antioxidants and zinc. Organic dark chocolate with a high percentage of Cocao is amazingly good for you. If your usual temptation is in the form of a Hershey bar, it may take a while to develop a pallet for the real thing, but I invite you to give it a try. I like just a few squares at a time, savoring each bite mindfully. 

Ok, back to cookies. I came across this recipe for more healthy chocolate chunk cookies on the popular blog  Not Eating Out In New York (I feel like I could author such a blog at this point, seeing as how moving to NYC drains you of all resources and results in a lot of eating in :). 

These morsels have a base of organic peanut butter, chopped dark chocolate and whole grain oats, and whole wheat flour. All items I happen to have on hand. 


I picked up Trader Joe's Dark Chocolate Truffle bar recently. A-M-A-Z-I-N-G. Perfect balance of creaminess and rich body. There is something immensely satisfying about chopping up a big hunk of chocolate. You don't get the same feeling from just pouring in a bag of those chips, believe me. 


These were delightful! I love the denser texture that whole wheat flour gives to baked goods. They feel more substantial in so many ways. Try them next time you feel the need to bake a batch. Guaranteed kids will never know the difference and will be better for everyone who gobbles them down. 


Enjoy!

Recipe for Whole-Wheat Peanut Butter Choc-Oat Cookies

Monday, January 24, 2011

A Healthier Fettucini Alfredo

My one, huge weakness as a teenager and beyond was the decadence of Fettucini Alfredo. Give me creamy, pasta, some grilled chicken, and I was good to go. Sadly, this is not the best dish for you, especially as you get older and notice pasta on your thighs and belly the day after (not kidding). I rarely have it anymore, as it's not particularly healthful with it's all-out lack of vegetable nourishment.


I received organic artisan pasta by Naples Pasta Company from my sister-in-law as a Christmas gift this year (thanks Bridg! :) and had yet to make it. I chose to cook the Spinach Basil Garlic Fettucini and topped it off with Trader Joe's Alfredo Sauce. I like to add in grated Parmesianno Reggiano and cracked black pepper to the jarred sauce.


Enter my little tip for injecting almost any pasta dish with some much-needed greens: Add in a bag of spinach about 2 minutes before the end of the pasta cooking time. This wilts the spinach nicely and you can just drain it all at once.


The Result: A lovely bowl of pasta with greenness and goodness instead of just starch and cream.  The spinach has a nice bitter bite to accompany the creaminess of the alfredo sauce. This dish perfectly illustrates my approach to cooking. There's no reason to not have comfort staples, just think about what you can do to make it a more complete meal.  I've found that as I try new and different foods, my taste buds need more complexity. 


Spinach Fettucini Alfredo

Ingredients:

Artisan Pasta, preferably spinach, basil, or other vegetable base
1 jar prepared alfredo sauce
1 bag pre-washed spinach
Parmegiano Reggiano
S&P

Put alfredo sauce in a large sauce pan. Grate a good amount of Parmeggiano Reggiano over and add in S&P. Heat and stir over medium-low heat to combine.

Meanwhile, cook fettucini according to package directions, adding in entire bag of pasta in the last 2-3 minutes of cooking time. Drain all in a colander. 

Combine sauce with noodle/spinach mixture and enjoy!

Friday, January 7, 2011

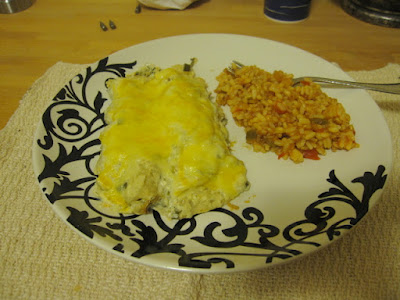
Salsa Verde Enchiladas

After a long week with a nasty head cold, I'm ready for some good comfort food. And nothing means comfort to a Texan quite like Enchiladas. I may be a proponent for healthy eating, but don't kid yourself: every time I go home I have to have classic Tex-Mex cheese enchiladas. All the better if there's a margarita machine churning somewhere.

I haven't been brave enough to try the supposed Tex-Mex restaurants in Brooklyn. It could turn out like trying to find decent barbecue in the Northwest (don't even try). I've made them at home many times and have come extremely close to what you find in Mexican greasy spoons all over Texas.


 But tonight I wanted to try something different. I came across a recipe for Salsa Verde Enchiladas, which is basically Enchiladas Suizas. This is enchiladas filled with chicken and smothered with a green, tomatillo and sour cream based sauce instead of tomatoes.


The most important step when making any type of enchiladas is cooking the corn tortillas quickly in oil, or in this case, salsa verde and juice of one lime. The trick is to do it just enough, but not too much, otherwise they get too soggy and fall apart. This imparts flavor and texture into the tortillas and makes them easier to roll.


Use wax paper and roll filling into them, then place in your 9 X 13 casserole dish, all lined up like little soldiers. I'm weird, I know it.


Then sour cream and chicken broth are added to the salsa verde mixture, and poured over the top.
After baking for 15 minutes, you add tons of cheese to the top like I did. Because I like cheese, that's why.


And there you have it! Perfect enchilada dinner at home. I made some spanish rice for a side, but you could also have beans or a salad.

As always, enjoy.

Salsa Verde Enchiladas recipe at Good Housekeeping

Saturday, January 1, 2011

New Year's Potato Salad

Sometimes it's difficult to get through a 5 lb. bag of potatoes when there's only two people in the house, and you've already done mashed potatoes AND Kale and Potato Soup. I often have some laying around waiting to be thrown together into something special. This time: potato salad. Perfect and humble fare on a dreary New Year's day with nowhere to go. I know this is a dish you think of more in the summertime, but as a southerner, any time is a good occasion for potato salad!

My recipe is one that I made up over time, or just depending on my mood. There are a myriad of options when choosing your ingredients, but I keep it pretty classic. This is also a recipe where the flavor is dependent on the quality of ingredients, so buy organic if you can. You'll think me!


 It's best to prepare the salad at least an hour in advance to let all the flavors marry together.

Start by rinsing and boiling your potatoes of choice. I had about 2 lbs. of small Yukon Golds around, but most people like reds. Boil them to the point a fork can be inserted easily, but not falling apart and watery; about 15 minutes. Remember to salt the water!

At the same time, boil 2 eggs. Here is how to perfectly boil eggs. Put eggs in the fridge for 30 minutes while you let the potatoes cool. This makes both easier to work with.


While they are cooling, dice half a small red onion, a few stalks green onions and few sprigs dill. I love dill, so I tend to use a lot! Put them all in a large bowl and enjoy the pretty colors. Remember: the more colorful your food the better it is for you. Always strive for a veritable rainbow on your dinner plate.


De-shell cooled eggs and chop, along with potatoes. The size is, again, up to you. Add to bowl along with a large dollop of mayo, small dollop dijon mustard, a little relish, and a splash apple cider vinegar. Stir it all together and taste test. Doctor it up with salt and pepper or any other spices you feel it needs. Chill in the fridge at least an hour.


There you have it! I served this with thick slices of warmed Black Forest ham and sauteed broccolini with garlic butter I keep in the freezer. Enjoy!


My Classic Potato Salad

Ingredients: 

About 2 lbs. yukon gold potatoes, cleaned and cut in half
2 eggs
1/2 small red onion
few green onions
few sprigs fresh dill
mayo
dijon mustard
relish
apple cider vinegar
S&P as needed


Boil potatoes for 15 minutes in salted water. Boil eggs. Let both cool for about 30 minutes on counter or fridge. 

Meanwhile, dice up onions and dill. Add to a large bowl. 

De-shell and chop eggs and potatoes and add to bowl. 

Stir all together with a large dollop mayo, small dollop mustard, relish, and splash red wine vinegar. Add more as needed along with salt and pepper to taste. 

Let chill in fridge at least one hour. 


Monday, December 27, 2010

Snow and Soup for the First Time....

I realize there has been a pause here. I intended to document a number of things this holiday season, but instead just wanted to enjoy them and not worry about them becoming posts. That happens sometimes. You know, real life.

As many of you know, the Northeast was pounded Sunday with a crazy blizzard, causing us all to have a transit-free snow day. No better way to break in the southerner than blowing snow and up to 4 feet deep drifts (I'm also learning new terminology from the hubby; don't laugh at me people from the middle :)


Outside my window


The occasion called for the hearty and healthy kale and potato soup I had planned. I discovered a version of the recipe in the new Cooking with Trader Joe's Book, of which I have a small mention for my "Pico-de-Gallo salsa and avocado make a great instant guacamole" idea.


Anyway, this is an excellent way to take in warming liquids and kale that is ridiculously good for you. I added kielbasa to mine, just because.


It also gave me the perfect opportunity to use my handy new toy (thanks Don)


Here is the link to the recipe for Kale and Potatoe Soup

I also served this with my favorite new cream biscuits to keep around in the freezer for just such an occasion.


Wednesday, December 8, 2010

Keeping a Recipe Binder

I don't know about you, but I come across recipes I intend to try all the time. For a while, I was just bookmarking them or tearing out the pages, but all those ideas spread out in many different places just left me even more overwhelmed and confused. 


Being the ever-diligent organizer I am, I started a recipe binder and I highly recommend you do too. Whether you are just starting out and want to keep it all tidy, or are a seasoned pro and need multiple binders for your kitchen, a recipe binder is an indispensable addition to your arsenal. Mine sits alongside my cookbooks, getting overstuffed by the day! 


How to get started:


1. Pick any old binder, at least size 2"


2. Grab some dividers*, or make your own for the following sections (feel free to take your own liberties here, these are what I use):

  • Appetizers/Entertaining
  • Sides/Vegetable Dishes
  • Mains 
  • Breads
  • Desserts
  • Breakfast


My Mains tab will eventually become it's own binder with subdivisions like:

  • Meat
  • Casseroles/Piles O' Food
  • Healthy
  • Pasta/Salads


3. Get a pack of plastic page protectors (then say that three times fast)


4. Print out recipes from the internet or tear out from magazines that you want to try. Double them up in the page protector back to back to save space. 


*I have to say it's nice to have the dividers with pockets so you can slide in odd-sized resources, like the Food Network Magazine's 50_____s inserts.


It's especially helpful when you want to try a recipe, to be able to just take out the page instead of keeping an entire cookbook open on the counter. That way, if you liked it, it goes back in the binder, if not, leave it out and fill the space with a new one. In the end you are not committed to them, and the ones left will be your tried and trues that you know you enjoy. 


My Favorite Sources for Recipes:


Thursday, November 25, 2010

Thanksgiving for Two

As I hear about the overwhelming stress of cooking for Thanksgiving, and all the dishes and all the prep and blah, blah, blah, I'm truly thankful to have a quiet dinner at home with just me and the hubby. This has been our little tradition for a few years, since we live away from our families and often find ourselves alone on some holidays. But don't be sad for us! Sometimes it's just nice to bypass the traffic and hectic run-around and relax with all the comforts of this time of year. 

I'm going to confess something: I don't like turkey. I'll eat it, but when was the last time you really craved turkey? Besides a fried turkey leg that is...now that makes your mouth water. 

Anyway, I've taken to preparing little game hens. They're just so damn cute and easy to work with. I usually marinate them for at least 24 hours ahead of time in a variety of concoctions. This year it was decidedly simple being that my kitchen is, as you know, not fully stocked. 


The main components here are olive oil, red wine (a Cab Sav), soy sauce, crushed garlic and fresh sage and thyme. I just eyeballed it all into a bowl, but it's about equal parts of all the liquids, maybe a little more soy sauce. Excuse me if I'm not always that precise, this is cooking after all!

Rinse and pat the hens dry with paper towels. And then, and this is very important....


You must make them dance. This is why I say they are so much fun! Try making a turkey dance. Not fun.


Then lay them together in the glass bowl with  marinade and make sure they are all covered and cozy. Put plastic wrap over top and keep in the refrigerator, turning them a couple times before cooking. 


Here they are before the big roast ready to go. I've stuffed them with hunks of celery and onion, and trussed them. I realize this is not a proper roasting pan with a metal rack, but it works just fine. Maybe I'll get one for Christmas? :)


And voila! They look beautiful after an hour in a 400 degree oven. They're ready when you prick the leg and juices run clear. I also don't have a meat thermometer right now, so this is a good trick to know.


On to....Cornbread Stuffing

The reason I love Thanksgiving so much. I could eat just this for the rest of my life and not care too much. It wasn't until I moved out of Texas that I realized cornbread stuffing was a certain type and not the only one out there! It's a staple in every southern household and it should be in yours too. 

I'm just sayin'


I take a shortcut and make a batch of Trader Joe's cornbread the day before. It's sweet and moist enough. If you have the time and the propensity, go ahead and make it from scratch. I commend you. 

When it's cooled, I break it up into pieces and let it sit out overnight in the casserole to dry out, stirring them occasionally. 


The next day, before you start, toast the heals of a loaf of bread, then tear it into pieces and mix in with the cornbread. The reason I don't do this earlier is because I've found the moisture from the cornbread will just soak into the toast. The idea is that the toast is stickier and will help everything hold together, since cornbread is crumbly. 


Next chop up some fresh Sage and Thyme, and melt a stick of butter in a skillet. Cook the herbs a few minutes before adding in chopped onion and celery to make a yummy base for the stuffing. Cook a few minutes more until everything is soft and looks like this:


Then mix it all in with the bread...


Then add in 2 beaten eggs and enough chicken broth to just moisten it, you don't want it soupy. I believe it's close to a cup, but be the judge.


 Mix it all up and flatten the top


Cook at 350 degrees for 45 minutes and you should have something like this. 


Life is good. 

Happy Thanksgiving.


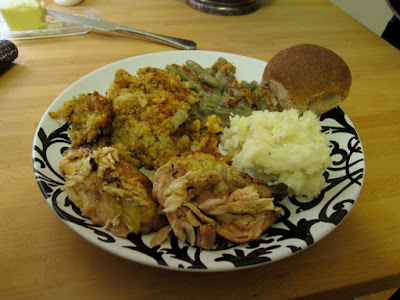
Full Menu: Roast Game Hens
               Cornbread Stuffing
               Green Bean Casserole
               Roasted Garlic Mashed Potatoes